Working with Graphics in Microsoft Word
Microsoft Word allows to simply insert graphics in a document. Graphics are give life to the dull and boring text documents. Following types of graphics are used in Microsoft Word to make the document beautiful and attractive:-
Text Box
A text box is used to add a piece of text at any place in a document. For example, a text box may be used to add text in margins of a page, in the center of the page, etc. To enter a text box:
- On the Drawing toolbar, click Text Box.
- Click or drag in the document where text box is to be inserted.
Types of Graphics in MS Word
There are two types of graphics that are usually added in a word processor. These are bitmap graphics and vector graphics.Bitmap graphics are made up of pixels. These can be thought of as painted pictures. Vector graphics are made up of lines and curves. These can be thought of as drawings.
Bitmap Graphics
Bitmap graphics are added to a document by selecting Insert/Picture option from the menu bar. Pictures can be inserted from a file, Clip Art, scanner. Charts and Word Art can also be added as pictures. When a picture is selected, the picture tool bar appears. This toolbar can also be accessed by selecting View>Toolbars>Picture. The picture toolbar is used to change shape, color, brightness, size, etc. of the selected picture.
Vector Graphics
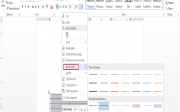
Vector graphics consist of lines, curves, etc. These are drawn using the Drawing toolbar. Clicking the Drawing icon W in the standard toolbar displays the Drawing Toolbar.
![]()
The Drawing toolbar contains buttons for creating and inserting different graphics, like lines, circles, rectangles, text boxes, WordArt and Autoshapes. It also has tools for editing and formatting these objects. Various tools for editing include fill tool, line-style tool, shadow and 3-D options. The Draw button at the leftmost comer of the drawing toolbar is used to select and draw drawing objects. The Drawing toolbar also provides a collection of predefined objects called Autoshapes that are commonly used in documents. Following figure shows some of these shapes. To draw a vector graphics:
- Click drawing icon to display drawing toolbar.
- Click on Select Object icon.
- The mouse pointer will change.
- Click the mouse on a drawing object, for example click on line object to select it. The mouse pointer will change to a cross-hair shape.
- Click and draw the object.
WordArt Graphics:
WordArt is a small program that runs in the Word environment. It is used to turn ordinary words into graphics objects. It can convert text into a variety of shapes, stretch letters, rotate words, add shading, colors, borders and shadows to text. A WordArt image is just like any other graphic object in Word.

Once created, it can be edited by using the standard graphics editing tools like move, copy, re-size, crop, etc.
Inserting a Word Art Object
To insert a WordArt object:
- Click the WordArt icon in the Drawing Toolbar, or choose WordArt from the Picture submenu in the Insert menu. The WordArt Gallery dialog box will appear.
- Choose the text effect that is to be applied and click OK. This will display Edit WordArt Text window.
- Choose the options for Font type, style, and size.
- Enter the text to which graphic effects are to be applied.
- Click OK and WordArt will create the text effect and place it at the insertion point.
Edit a WordArt Graphics
The WordArt graphic can be edited just like any other graphic object in Word. When a WordArt object is selected, the WordArt toolbar appears on the screen. This toolbar is shown in below:
This toolbar provides all the editing options that can be used to change and manipulate the WordArt object.